Overview of User Interface Components
Here, we will walkthrough the components making up the user interface for the Orchestration-Basics demo project.
Table of Contents
- Overview of User Interface Components
The UI for the orchestration dApp is divided into multiple components, each responsible for a specific piece of functionality. Below is an overview of the key components and their roles.
You can find these components in ui/src/components/Orchestration.
Installation
From inside of the ui/ folder, you can run yarn install. It is recommended to use node v18.
From there, you can run yarn dev to start the ui.
Orchestration.tsx
Purpose
The Orchestration.tsx component serves as the main controller for the orchestration dApp's user interface. It manages the state and interactions required for users to create accounts, manage their balances, and perform various blockchain transactions such as deposits, withdrawals, staking, and unstaking.
Key Interactions
- Account Management: Utilizes components like
AccountList,CreateAccountButton, andChainSelectorto allow users to view and manage their accounts across different chains. - Transaction Handling: Interfaces with the Agoric wallet and the Keplr wallet for signing and broadcasting transactions. It supports various types of transactions, including deposits, withdrawals, staking, and unstaking.
- Retrieving Balance: Fetches and displays account balances in real-time for any native-denom the user holds.
- Modal Interactions: Manages modal dialogs for user actions such as creating accounts and making deposits. These dialogs provide feedback on transaction status, ensuring users are informed of the progress and outcome of their actions.
- State Management: Relies on hooks and context (e.g.,
useContractStore,NotificationContext) to maintain and update the application's state, ensuring a seamless user experience.
Imports and Setup
import React, { useState, useContext, useEffect, useRef } from 'react';
import { useAgoric } from '@agoric/react-components';
import { useContractStore } from '../../store/contract';
import { NotificationContext } from '../../context/NotificationContext';
import { Button } from 'react-daisyui';
import AccountList from './AccountList';
import ChainSelector from './ChainSelector';
import CreateAccountButton from './CreateAccountButton';
import { fetchBalances } from './FetchBalances';
import { makeAccountOffer } from './MakeAccountOffer';
import { initializeKeplr } from './KeplrInitializer';
import RpcEndpoints from './RpcEndpoints';
import { StargateClient, SigningStargateClient } from "@cosmjs/stargate";- React hooks:
useState,useContext,useEffect, anduseRefare used for managing state, context, side effects, and references to DOM elements. - Custom hooks and context:
useAgoric,useContractStore, andNotificationContextare utilized to interact with the Agoric ecosystem, manage contract data, and handle notifications. - UI Components: The component imports child components (
AccountList,ChainSelector,CreateAccountButton) that handle specific parts of the UI.
Component State and Refs
const Orchestration = () => {
  const { walletConnection } = useAgoric();
  const { addNotification } = useContext(NotificationContext);
  const [offerId, setOfferId] = useState('');
  const icas = useContractStore(state => state.icas);
  const [balances, setBalances] = useState([]);
  const [selectedChain, setSelectedChain] = useState('');
  const [loadingDeposit, setLoadingDeposit] = useState<{ [key: string]: boolean }>({});
  const [loadingWithdraw, setLoadingWithdraw] = useState<{ [key: string]: boolean }>({});
  const [loadingStake, setLoadingStake] = useState<{ [key: string]: boolean }>({});
  const [loadingUnstake, setLoadingUnstake] = useState<{ [key: string]: boolean }>({});
  const [loadingCreateAccount, setLoadingCreateAccount] = useState(false);
  const [modalContent, setModalContent] = useState('');
  const [modalOpen, setModalOpen] = useState(false);
  const [modalAddress, setModalAddress] = useState('');
  const [selectedDenom, setSelectedDenom] = useState('uist');
  const [amount, setAmount] = useState(0);
  const [statusText, setStatusText] = useState('');
  const modalRef = useRef<HTMLDialogElement | null>(null);
const guidelines = false;- State management: Multiple states are used to track various aspects of the component, including selected chain, balances, loading states for different operations, modal content, and transaction status.
- Refs:
modalRefis used to control the modal dialog, allowing it to be opened and closed programmatically.
Toggle Modal Visibility
  const handleToggle = () => {
    setModalOpen(prevState => !prevState);
  };
Modal toggling: This function toggles the visibility of the modal dialog, changing its open/close state.
Effect Hook for Loading Balances
  useEffect(() => {
    const loadBalances = async () => {
      try {
        const fetchedBalances = await fetchBalances(icas, selectedChain);
        setBalances(fetchedBalances);
      } catch (error) {
        console.error('failed to fetch balances:', error);
      }
    };
    if (icas && icas.length > 0) {
      loadBalances();
    }
  }, [icas, selectedChain]);
Loading balances: This useEffect hook fetches the balances for the accounts when icas or selectedChain changes. It makes sure the balances are updated in real-time based on the selected chain.
Opening Modal with Content
  const openModal = (content: string, address: string = '') => {
    setModalContent(content);
    setModalAddress(address);
    handleToggle();
  };
Modal initialization: This function sets the content and address for the modal and then toggles it open.
Effect Hook for Modal Display
  useEffect(() => {
    if (modalRef.current) {
      if (modalOpen) {
        modalRef.current.showModal();
      } else {
        modalRef.current.close();
      }
    }
  }, [modalOpen]);
Modal display: This effect handles the actual opening and closing of the modal dialog by calling the appropriate methods on the modalRef when modalOpen changes.
Handling Account Creation
  const handleCreateAccount = () => {
    openModal('Create Account');
    setLoadingCreateAccount(true);
    setStatusText('Submitted');

    if (walletConnection) {
      makeAccountOffer(walletConnection, addNotification!, selectedChain, setLoadingCreateAccount, handleToggle, setStatusText)
        .catch((error) => {
          addNotification!({
            text: `transaction failed: ${error.message}`,
            status: 'error',
          });
          setLoadingCreateAccount(false);
          handleToggle();
        });
    } else {
      addNotification!({
        text: 'error: please connect your wallet or check your connection to RPC endpoints',
        status: 'error',
      });
      setLoadingCreateAccount(false);
      handleToggle();
    }
  };
Account creation: This function initiates the account creation process by opening a modal and setting the loading state. It then attempts to make an account offer via the makeAccountOffer function, handling success or failure accordingly.
Handling Deposit
  const handleDeposit = (address: string) => {
    openModal('Deposit', address);
  };
Deposit handling: This function prepares the modal for a deposit action by setting the modal content to 'Deposit' and passing the selected address.
Executing Deposit Transaction
    if (result.code !== undefined && result.code !== 0) {
        throw new Error(`Failed to send IBC transfer: ${result.log}`);
    }
    console.log("IBC transfer sent successfully");
    }
} catch (error) {
    console.error("failed to deposit:", error);
} finally {
    setLoadingDeposit(prevState => ({ ...prevState, [modalAddress]: false }));
    handleToggle();
}
Deposit execution: This function handles the actual execution of a deposit transaction. It sets the loading state, interacts with the blockchain through Keplr and StargateClient, and manages different scenarios based on the address prefix, either using Cosmos SDK messages or IBC transfers (for now, this will be handled by the contract in a newer dapp version). If the deposit fails, it logs the error and resets the loading state. After the transaction, it toggles the modal to close it.
Handling Withdraw
const handleWithdraw = (address: string) => {
openModal('Withdraw', address);
setLoadingWithdraw(prevState => ({ ...prevState, [address]: false }));
};
Withdraw handling: This function initializes the withdrawal process by setting the modal content to 'Withdraw' and updating the loading state for the selected address.
Handling Stake and Unstake
const handleStake = (address: string) => {
openModal('Stake', address);
setLoadingStake(prevState => ({ ...prevState, [address]: false }));
};

const handleUnstake = (address: string) => {
openModal('Unstake', address);
setLoadingUnstake(prevState => ({ ...prevState, [address]: false }));
};
Stake and Unstake handling: These functions set up the modals for staking and unstaking operations by setting the relevant modal content and updating the loading state for the selected address.
Rendering the Component
return (
    <div className="flex w-full flex-col items-center">
      <div className="w-full p-4">
        <div className={`flex flex-row justify-between items-start space-x-10 border${guidelines ? "" : "-0"}`}>

          <AccountList balances={balances} handleDeposit={handleDeposit} handleWithdraw={handleWithdraw} handleStake={handleStake} handleUnstake={handleUnstake} loadingDeposit={loadingDeposit} loadingWithdraw={loadingWithdraw} loadingStake={loadingStake} loadingUnstake={loadingUnstake} guidelines={guidelines} />

          <div className={`flex flex-col w-1/2 space-y-4 pl-4 rounded-lg p-4 border${guidelines ? "" : "-0"}`}>
            <ChainSelector setSelectedChain={setSelectedChain} />
            <CreateAccountButton handleCreateAccount={handleCreateAccount} loadingCreateAccount={loadingCreateAccount} />
          </div>
        </div>
      </div>

        {/* modal */}
        <dialog ref={modalRef} className="daisyui-modal">
            <div className="daisyui-modal-box w-full max-w-md">
                <button className="daisyui-btn daisyui-btn-sm daisyui-btn-circle daisyui-btn-neutral absolute right-2 top-2" onClick={handleToggle}>✕</button>
                <h3 className="font-bold text-lg">{modalContent}</h3>
                {modalContent === 'Create Account' && (
                    <div className="py-4 flex flex-col items-center justify-center">
                        <p>{statusText}</p>
                        {loadingCreateAccount && (
                            <svg aria-hidden="true" role="status" className="inline w-4 h-4 me-3 text-gray-200 animate-spin dark:text-gray-600" viewBox="0 0 100 101" fill="none" xmlns="http://www.w3.org/2000/svg">
                                <path d="M100 50.6C100 78.2 77.6..." fill="currentColor" />
                                <path d="M94 39C96.4 38.4 97.9..." fill="#1C64F2" />
                            </svg>
                        )}
                    </div>
                )}
                {modalContent === 'Deposit' && (
                <div>
                    <label className="block">
                    <span className="text-gray-700">Select Denom</span>
                    <select value={selectedDenom} onChange={e => setSelectedDenom(e.target.value)} className="form-select mt-1 block w-1/2">
                        <option value="ubld">BLD</option>
                        <option value="uist">IST</option>
                        <option value="uosmo">OSMO</option>
                        {/* Add more options as needed */}
                    </select>
                    </label>
                    <label className="block mt-4">
                    <span className="text-gray-700">Amount</span>
                    <input type="number" value={amount} onChange={e => setAmount(parseInt(e.target.value))} className="form-input mt-1 block w-1/2" />
                    </label>
                    <div className="modal-action mt-4">
                    <button className="daisyui-btn daisyui-btn-info daisyui-btn-sm mr-2" onClick={executeDeposit} disabled={loadingDeposit[modalAddress]}>
                        {loadingDeposit[modalAddress] ? (
                        <svg aria-hidden="true" role="status" className="inline w-4 h-4 me-3 text-gray-200 animate-spin dark:text-gray-600" viewBox="0 0 100 101" fill="none" xmlns="http://www.w3.org/2000/svg">
                            <path d="M100 50.5908C..." fill="currentColor"/>
                            <path d="M93.9676 39.0409C96.393 38.4038..." fill="#1C64F2"/>
                        </svg>
                        ) : 'Confirm'}
                    </button>
                    <button className="daisyui-btn daisyui-btn-sm daisyui-btn-neutral" onClick={handleToggle}>Close</button>
                    </div>
                </div>
                )}
            </div>
        </dialog>
    </div>
  );
Main UI Structure: The component's return statement builds the main UI structure. Here are the key elements to take-away from what we are rendering:
- AccountList Component: Displays the list of user accounts and allows interactions like deposit, withdraw, stake, and unstake.
- ChainSelector and CreateAccountButton: These components are used to select the blockchain network and create a new account, respectively.
- Modal Dialog: A modal dialog is used to provide user feedback and interaction for actions like creating accounts and performing transactions. The dialog content is dynamically set based on the current operation.
makeAccountOffer Function
The makeAccountOffer function is a key part of the user-interaction flow in the orchestration dApp. It handles the logic for constructing & submitted an offer on the blockchain by interacting with the Agoric wallet and managing the offer's lifecycle:
Function Signature
export const makeAccountOffer = async (
  wallet: AgoricWalletConnection,
  addNotification: (arg0: DynamicToastChild) => void,
  selectedChain: string,
  setLoadingCreateAccount: React.Dispatch<React.SetStateAction<boolean>>,
  handleToggle: () => void,
  setStatusText: React.Dispatch<React.SetStateAction<string>>
) => {Parameters:
wallet: Represents the Agoric wallet connection used to submit the offer to the blockchain.addNotification: A function used to display notifications to the user, such as success or error messages.selectedChain: The name of the chain where the account is being created.setLoadingCreateAccount: A state update function to manage the loading state of the account creation process.handleToggle: A function to toggle the state of the UI, such as closing or opening modals.setStatusText: A state update function to set the status message displayed to the user.
Chain Selection Validation
  if (!selectedChain) {
    addNotification({
      text: `Please Select Chain`,
      status: 'error',
    });
    setLoadingCreateAccount(false);
    handleToggle();
    return;
}Purpose:
- The function begins by checking if a chain has been selected. If
selectedChainis not provided, it triggers an error notification, stops the loading process, and exits the function early. - Why This Matters: Chain selection is crucial because the dApp interacts with multiple chains, and knowing which chain to operate on is necessary for any blockchain transaction.
Contract Instance Retrieval
  const { instances } = useContractStore.getState();
  const instance = instances?.['orca'];

  if (!instance) {
    setLoadingCreateAccount(false);
    handleToggle();
    throw Error('no contract instance');
}Purpose:
- The function retrieves the contract instance from the state using
useContractStore. Specifically, it looks for theorcacontract instance. - Why This Matters: Without the correct contract instance, the dApp cannot interact with the blockchain to create an account. If the instance is not found, the function halts and an error is thrown.
Offer Preparation
  const want = {};
  const give = {};

const makeAccountofferId = Date.now();Purpose:
- The
wantandgiveobjects represent the assets that the user expects to receive or provide in the offer. In this case, they are empty because the offer is for account creation, not a typical trade. - Offer ID: The
makeAccountofferIdis generated using the current timestamp. This ID uniquely identifies the offer and is used to track its progress.
Submitting the Offer
  await wallet?.makeOffer(
    {
      source: 'contract',
      instance,
      publicInvitationMaker: 'makeAccountInvitation',
    },
    { give, want },
    { chainName: selectedChain },
async (update: { status: string; data?: unknown }) => {Purpose:
- The
makeOffermethod on thewalletobject submits the offer to the blockchain. The offer is tied to theorcacontract instance and uses themakeAccountInvitationmethod, which is defined in the contract's public facet. - Why This Matters: This is the core action that interacts with the blockchain, making the user's intent (in this case, account creation) known to the smart contract.
Handling Offer Updates
      if (update.status === 'error') {
        const msg = `offer update error: \${update.data}`;
        addNotification({
          text: msg,
          status: 'error',
        });
        setLoadingCreateAccount(false);
        handleToggle();
        console.log(update);
        setStatusText(msg);
      }
Error Handling:
- If the offer submission encounters an error, the status is checked. An error message is logged, a notification is displayed to the user, and the UI state is updated to reflect the failure.
- Why This Matters: Robust error handling to verify that users are kept informed and the UI can recover gracefully from failures during the submission of offers to the contract instance.
Successful Offer Handling
      if (update.status === 'accepted') {
        const msg = 'Account created successfully';
        addNotification({
          text: msg,
          status: 'success',
        });
        console.log(update);
        setStatusText(msg);

        setTimeout(() => {
          setLoadingCreateAccount(false);
          handleToggle();
          setStatusText(msg);
        }, 2000);
      }
Success Handling:
- If the offer is accepted, a success notification is displayed, and the UI reflects the successful creation of the account. The function also uses a
setTimeoutto delay the reset of the loading state, allowing users to see the success message. - Why This Matters: Providing clear feedback for successful actions allows users to know their actions were successful.
Refunded Offer Handling
      if (update.status === 'refunded') {
        addNotification({
          text: 'offer was refunded',
          status: 'error',
        });
        setLoadingCreateAccount(false);
        handleToggle();
        console.log(update);
      }
    },
    makeAccountofferId
  );
};
Refund Handling:
- If the offer is refunded (e.g., the account creation could not be completed), a notification is shown to the user, and the UI state is updated to reflect this.
- Why This Matters: Handling refunded offers is critical in ensuring users are informed of why their transaction did not go through, helping them understand what went wrong and what they can do next.
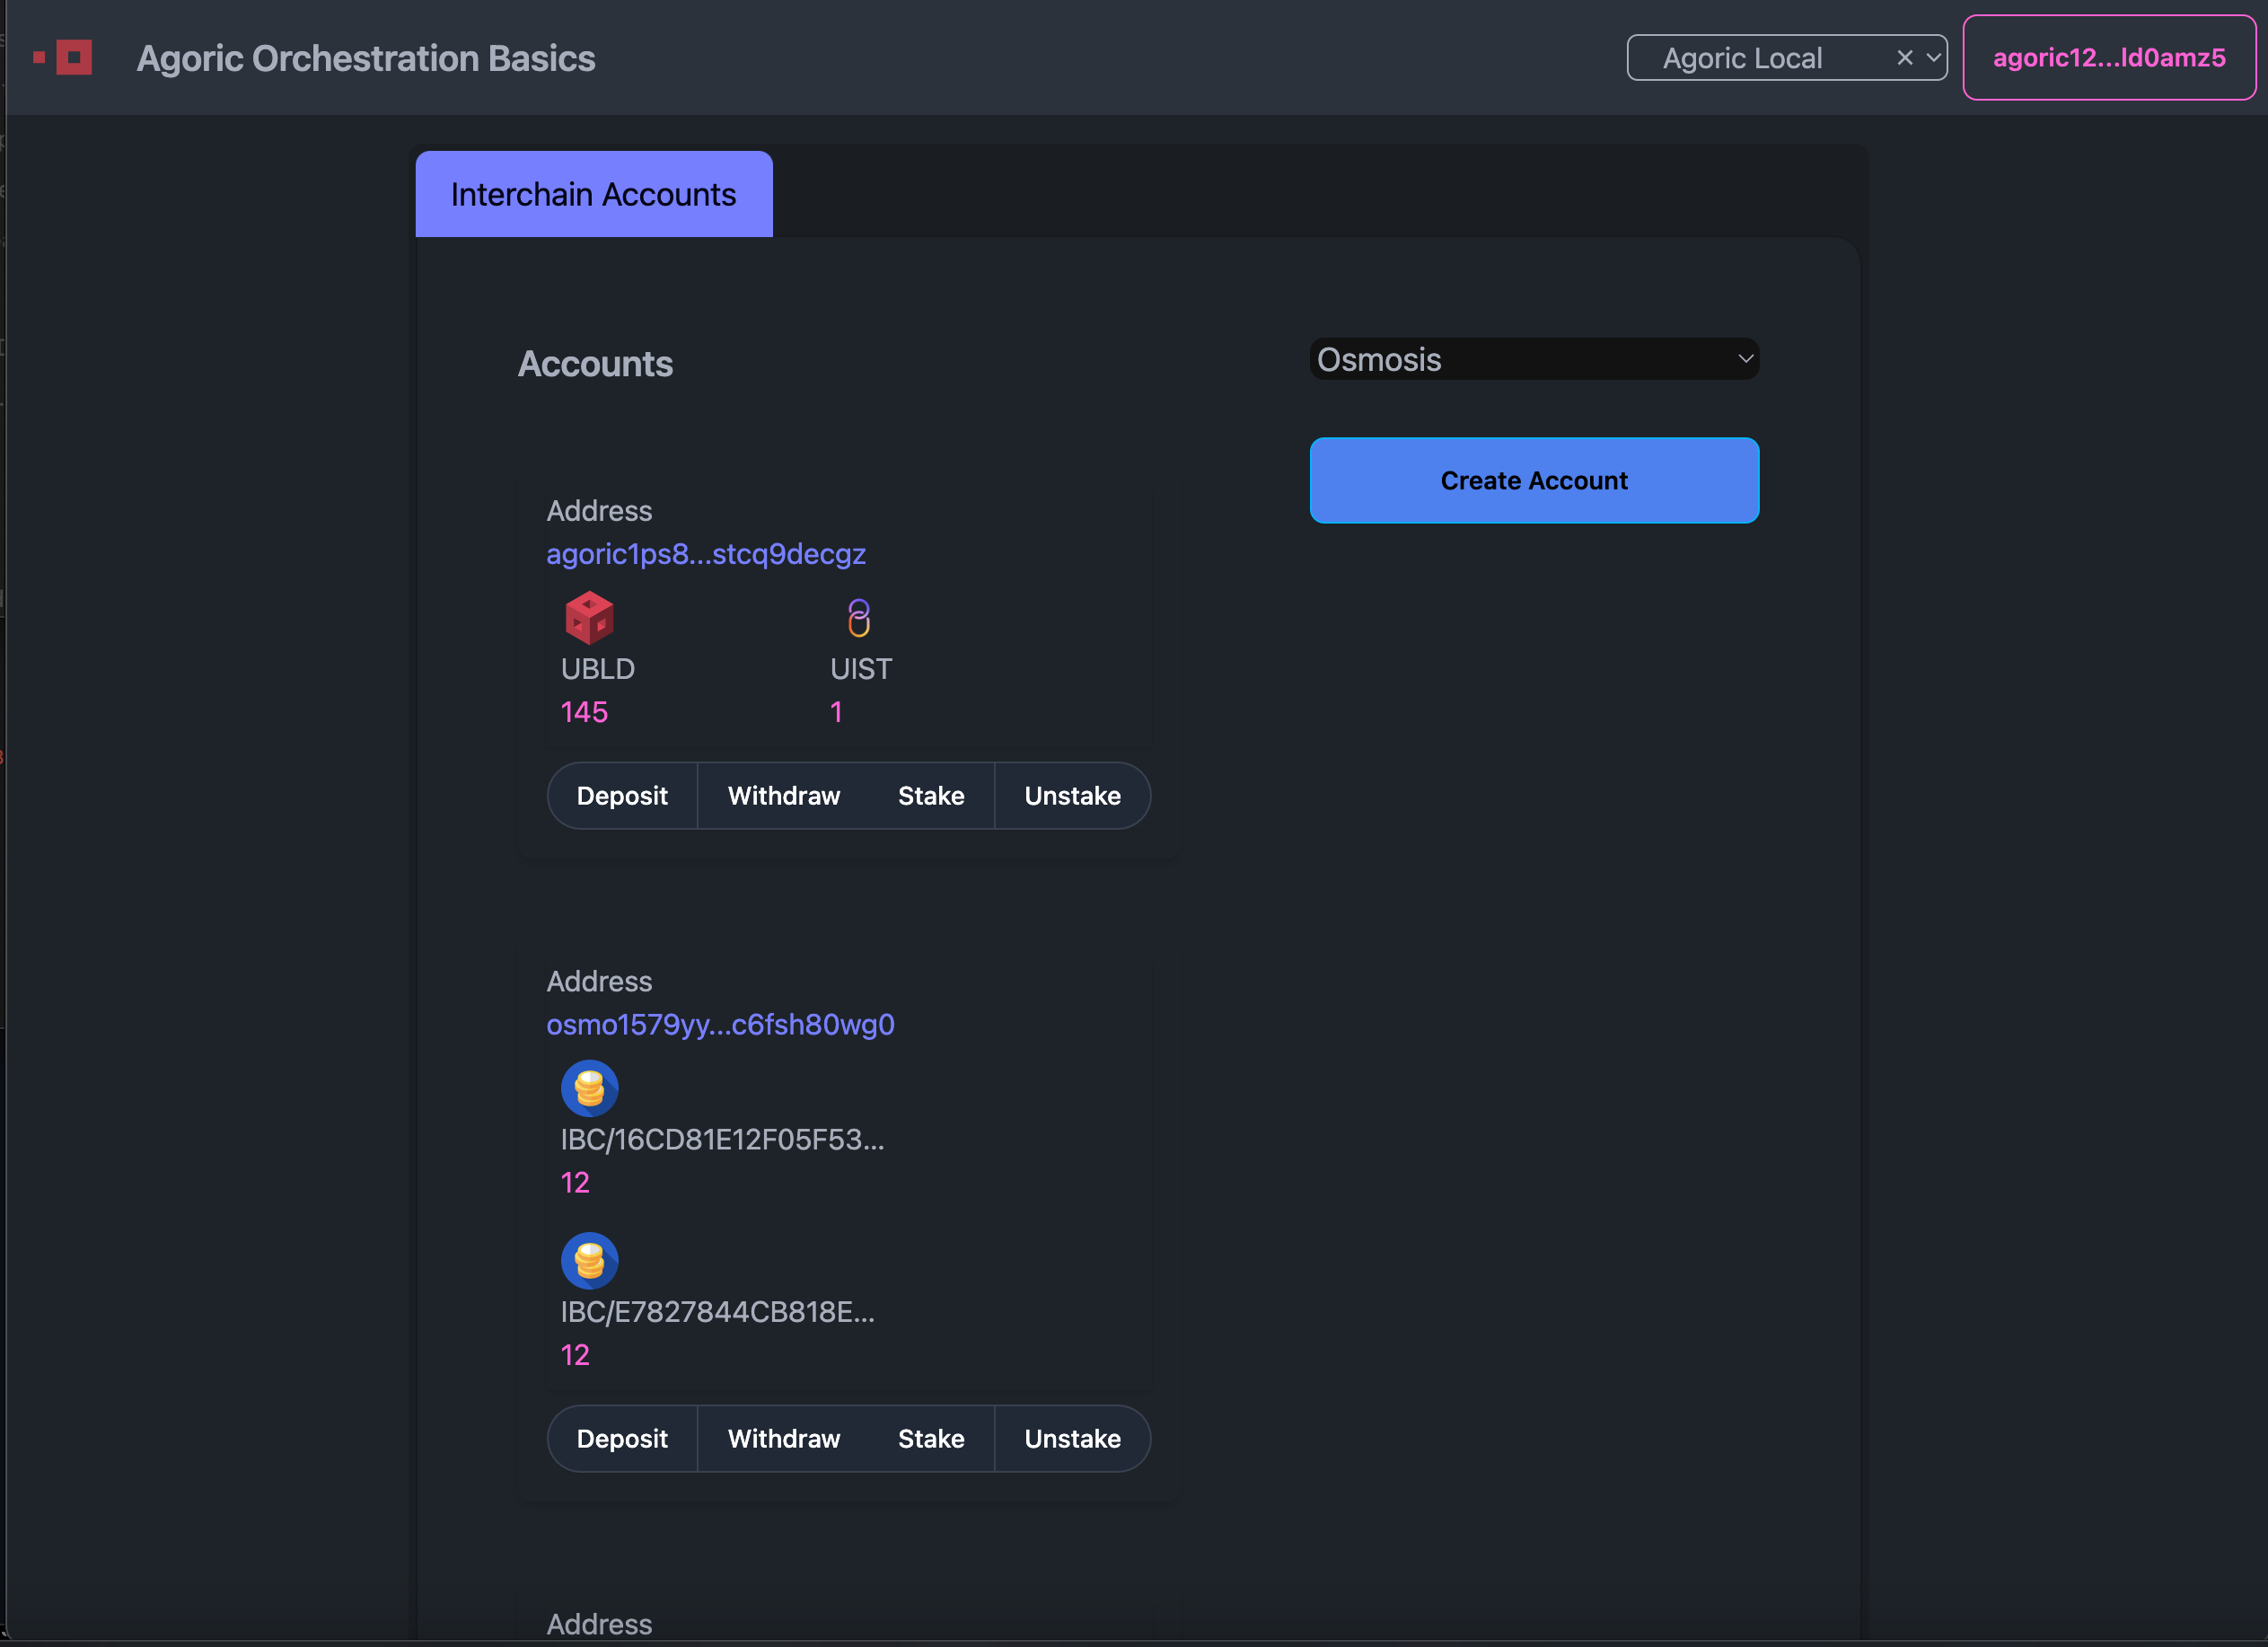
AccountList.tsx
Purpose
The AccountList.tsx component is responsible for displaying the list of user accounts and their associated balances in various native denoms. It presents account information in a structured and user-friendly format, allowing users to view and interact with their Orchestration Accounts directly.
Key Interactions
- Balance Display: Fetches and displays the balances for each account in real-time. Each account is shown with its corresponding balances in various denoms.
- User Actions: Provides a button group for users to perform actions such as depositing, withdrawing, staking, and unstaking assets. Each button triggers its respective handler function.
- Visual Feedback: The component updates the UI to reflect the loading state for each action, ensuring that users are informed of the transaction process. This includes disabling buttons and showing spinners when actions are in progress.
- Address Handling: Truncates and displays the account addresses to maintain a clean UI while still providing users with the essential account details.
Key Interactions
When clicked, this button initiates the account creation offer being submitted to the contract. It interacts with the makeAccountOffer function, described above.
FetchBalances.tsx
Purpose
The FetchBalances.tsx component is responsible for retrieving the balances of user accounts from different blockchains. It interacts with the local RPC endpoints to fetch balance data for addresses on supported chains (for Osmosis and Agoric).
Key Interactions
- RPC Communication: Connects to blockchain networks using the
StargateClientfrom the@cosmjs/stargatepackage, communicating with the specified RPC endpoints to retrieve balance information. - Address Handling: Determines the correct blockchain network based on the prefix of the provided address (e.g.,
osmo1for Osmosis,agoric1for Agoric) and fetches the corresponding balances. - Error Handling: Implements error handling to manage cases where balance retrieval fails, ensuring that the UI is informed of such issues without crashing the application.
- Asynchronous Processing: Uses
Promise.allto handle multiple asynchronous balance fetch requests simultaneously, optimizing the performance of balance retrieval across multiple accounts.
RpcEndpoints.tsx
Purpose
Provides a convenient place to manage RPC endpoints for different chains, including your local agoric instance, to be used by different components.
Key Interactions
Used by other components, like FetchBalances, to interact with the correct blockchain network.
ChainSelector.tsx
Purpose
Provides a basic UI element for users to select the Cosmos chain they want to interact with. Selecting a chain is crucial as different chains offer different services or have different orchestration rules.
Key Interactions
The selected chain is passed back to the parent component, Orchestration.tsx, and used in various transactions and interactions.
CreateAccountButton.tsx
Purpose
A demo button that triggers the process of creating a new account on a selected Cosmos chain.